Tag Archives: baby play

Pint-Sized Paint Party

Babies + Paint = Chaos…or just a ton of fun?

I don’t program quite as much as I used to (and particularly not as much as I did during work-from-home pandemic times!). Stepping into management has meant stepping back from day-to-day programming. Most of my programming is filling in when my team are off.

I still enjoy programming, but since presenting programs is now adjacent to my job rather than its primary function, when I do program, I find myself repeating or reimagining programs I’ve done before. One of my favorite programs from both my current and last library has been a Pint-Sized Paint Party.

Pint-Sized Paint Party Logistics

  • Program Length: 45 minutes – 1 hour
  • Ages: 6 months – 5 years
  • Structure: station-based drop-in
    • 5-8 stations spread out in a large programming room
    • Tarps on the floor under potentially messy areas
    • Mixture of clean and messy stations, though everything is non-toxic and washable
  • Prep: Decent amount of pre-program prep but almost all tasks can be done by volunteers (freezing paint cubes, opening paint bottles, stuffing bags, securing tarps to floor)

Pint-Sized Paint Party Stations

Paint-in-a-Bag Activities (Clean)

Participants could choose from a selection of 3 contained paint activities:

  • Bubble Wrap Pack (5 x 7 clear bubble wrap envelope with cardstock inside)
  • LOVE Canvas Bag (9 x 12 canvas with the letters LOVE taped in painter’s tape, all in a large freezer gallon-sized ziploc bag) Inspired by Eat Teach Laugh Craft.
  • Shaker (circular food container with piece of white cardstock and ping-pong ball inside)

Participants brought their selection to staff or teen volunteers who added drips of up to 3 colors of paint before taping the item shut with packing tape.

Families took their creations home with them to dry – though the LOVE canvases most resembled a long-term keepsake.

Ice Cube Painting (Messy)

Kids selected a frozen paint cube to color on cardstock as the paint melted.

I’ve read blog posts about folks successfully doing this with water and food coloring, but I’ve never got this to work well (the water melts, but it remains clear on paper).

Instead, I froze Crayola Washable Paint in ice cube trays with half-popsicle-sticks inside each cube. (And plenty of written and verbal warnings to caregivers that those cubes are all paint.)

The timing can be mildly tricky – the cubes should come out of the ice cube trays within a few minutes of coming out of the freezer. They can sit in a different container until they are used, but if you leave the melting cubes in the ice cube trays, they will start to stick to the tray and collapse.

Of course, you don’t want to take them out of the freezer too early, or they will melt before a kid can use them.

If you take them out too close to painting, they won’t have melted enough and kids will grow frustrated that nothing is happening.

While that sounds complicated – it really isn’t too bad in practice. Kids liked touching and manipulating the paint with their hands, and the frozen-style kept the mess pretty contained.

Water Painting (Clean – can get wet)

I’ve talked a bit about water painting on this blog – it is so simple and mess-free.

Wall Painting (Clean)

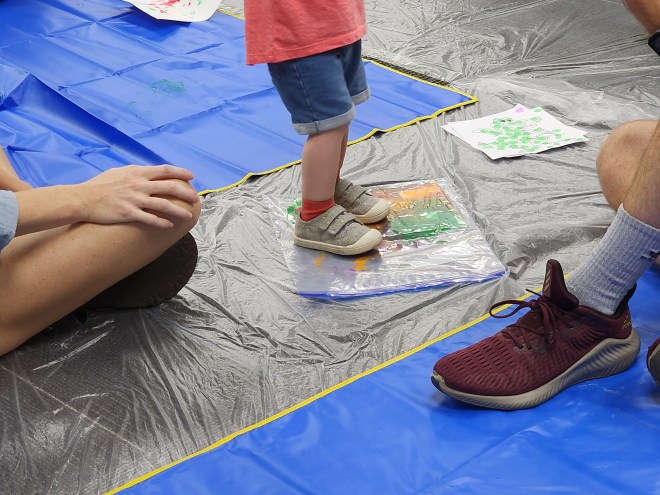
Kids pushed, poked, and explored freezer Ziploc bags with paint inside. They experimented with mixing colors.

Bags were securely taped to a wall or large moveable dry-erase board.

Dot Markers (Clean-ish)

Not quite paint, but close! Kids used dot markers to color pre-printed coloring pages or to make their own creations.

Art Crawl (Messy)

I only ran this station at one library – the station is fun, but the setup takes a lot of time. I used a freestanding baby-gate setup to create an enclosed area layered with tarps on the ground and butcher paper on top. I added piles of paint and various toddler paint toys, and then…I let the babies have fun!

This was supremely messy and required lots of cleaning supplies for caregivers. Not too many caregivers dared to put their babies in the paint pit – but those who did had a blast.

Other Toys

To help keep the youngest ones engaged, I also put out a variety of on-hand brightly colored baby-friendly toys, such as:

Play & Learn at Home

Last summer, a coworker and I ran a very successful baby and toddler play program. Each week, about 80-100 parents and little ones joined us for a variety of interactive activities.

Six months ago, when we were planning for May-August 2020, we were thrilled to be able to offer Play & Learn again this summer, plus an additional four weeks in May.

Then COVID happened.

Obviously we weren’t expecting a pandemic, but luckily we were able to shift our plans to adapt this program virtually for the month of May, creating Play & Learn at Home.

Each week, Lisa (my coworker) and I emailed caregivers registered for Play & Learn at Home a video and instruction sheet for two DIY play activities, made from objects commonly found around the house.

My share of the content can be found below:

Cereal Boxes and Straws

Cereal Boxes & Straws Instruction Sheet

Tissue Box Play

Tissue Box Play Instruction Sheet

Tape Play

Tape Play Instruction Sheet

Card Slot Drop

Card Slot Drop Instruction Sheet

Make sure to check out Lisa’s great content as well. Check out the links below about how to make:

At-Home Baby Play

I’ve written a ton of baby play posts on this blog, and, since many of us are stuck at home for a while, I wanted to highlight some of my favorite at-home baby play activities that can easily be replicated with around the house objects.

Other awesome play ideas with everyday objects:

What at-home baby play ideas am I missing? Post other ideas in the comments, and I will add them to the lists above.

Baby Play: Sensory Bottles

After each of my baby storytimes, I include a Discovery Time free-play session that encourages parents to talk to one another and to interact with their children. I include a variety of fine motor, gross motor, and sensory activities that appeal to 0-2-year-olds.

Sensory play is very important for all ages but especially for babies. Babies are exploring concepts (like gravity and motion) and textures for the first time. Their brains are growing at exponential rates as they learn how they can manipulative the world around them.

There are so many ways to encourage sensory play in a storytime setting. I regularly use textured tiles, liquid tiles, sensory boards, sensory bags, and, more recently, sensory bottles. Unless the program is designed and advertised as play only, I avoid sensory bins (except for water play) since objects inside those bins are often choking hazards (and there isn’t enough time to clean up beans, rice, sand, or water beads from the floor between story times).

Sensory bottles allow little ones to manipulate liquids without getting wet or manipulate small objects that would be a choking hazard or dangerous if left out for free play.

My most recent set of bottles included:

  • Mixtures of oil and water with food coloring
  • Water Beads
  • Water with small plastic spoons
  • Hair gel with suspended items
  • Oil with chunks of floating glitter glue

You can also add objects to create sound bottles like:

  • Paperclips
  • Thumbtacks
  • Googly Eyes
  • Keys

How to Make Sensory Bottles

Materials: Voss water bottles (the best type of bottle), materials to fill bottles, clear packing tape

Steps:

  • Empty Voss water bottle. Carefully peel off all labels. These should come off cleanly with no leftover residue.
  • Fill bottle with desired items or mixture.
  • Wrap 2-3 layers of clear tape around bottom of cap.

Cost: $12+ (depends what you have on hand)

Time to Make: 5 minutes

Tips: Voss bottles are the way to go. These are the perfect size for small hands and the labels peel off perfectly, creating a clear, smooth surface.

You can hot glue the bottle closed as well, but babies will not try to peel off tape they can’t see. Clear packing tape around the clear bottle is essentially not visible to little ones, so they don’t try to open the bottle. We’ve never had a child successfully get into a taped bottle.

Conversation Starters

Start conversations as babies play with this tool by asking questions like:

  • What happens when you shake the bottle?
  • What sound does the bottle make if you shake it?
  • What happens if you turn the bottle upside down?
  • Do the items in the bottle float?
  • What colors are in the bottle?
  • How many items are in the bottle?
  • What would you put in a bottle?

Stretch Vocabulary

When talking with little ones, use big words and small words. The more new words a child hears, the larger their vocabulary will be when they start to learn to read.

Consider using some of the following vocabulary words when using this activity:

Bounce
Drip
Faint
Fast
Float
Hash

Jolt
Knock
Loud
Muffled
Pleasant
Quickly

Quiet
Rattle
Shake
Slow
Soft
Wiggle

Baby Play: Liquid Tiles

After each of my baby storytimes, I include a Discovery Time free-play session that encourages parents to talk to one another and to interact with their children. I include a variety of fine motor, gross motor, and sensory activities that appeal to 0-2-year-olds.

Sensory play is very important for all ages but especially for babies. Babies are exploring concepts (like gravity and motion) and textures for the first time. Their brains are growing at exponential rates as they learn how they can manipulative the world around them.

I’ve been using textured tiles for a while. These are liked by all and allow babies to explore different surfaces in a safe environment. The foam puzzle tiles allow for adults or kids to create a path, a large block of textured squares, or any other shape they can think of.

However, my textured tiles have been put to shame by my coworker’s amazing liquid tiles. These have gone through many iterations, and, unfortunately, are not leak-proof.

We recently purchased factory-made liquid tiles that have also been fan favorites. These have been well-loved in the last three weeks with no signs of breaking. They are especially loved by the larger kids and adults, who can safely step on these without being concerned about them breaking.

Both types of tiles have different advantages–read on to see my pros and cons of each style, plus how to make those awesome handmade liquid tiles.

DIY Liquid Tiles

This method is developed by the talented Sarah Simpson, who I would make write this post except she is at home with her own new baby at the moment.

Materials: lamination pouches (the thicker the better; example is 5 mil), iron, baby oil (4-6 oz. a tile), food coloring, various items to add into bags, duct tape

Optional: Foam Puzzle Tiles (any size, extra large in images), Industrial Hole Punch, Zip Ties

Steps:

  • Trim lamination pouch to your ideal size. If you are planning to attach it to a foam puzzle tile or other surface, measure to fit that surface while leaving some space around the edges for eventual attachment.
  • Iron three sides of the pouch shut, at least 1.5″ around each edge.
  • Insert 4-6 oz. of baby oil into the open end of the pouch.
  • Insert a mixture of other items. Consider water with food coloring, plastic bingo chips, large foam shapes, googly eyes, or tissue paper squares.
  • Remove as much air from the pouch as possible while ironing the last side closed.
  • Wrap colorful duct tape around all edges. Leave a margin of duct tape around the edges (at least 0.5″ thick) that does not have any lamination bag in between the duct tape.
  • You can stop here, unless you want to attach your bag to a tile. The tiles create a different sensory experience for babies, but, be warned, we have never had a tile last more than 3-6 months (sometimes 3-6 days) before some part starts leaking. We think the leaking has to do with the industrial holepunch in the steps below, since bags not attached to tiles have not had this issue.
  • Use an industrial hole punch to punch a hole through the duct tape towards the edge of the bag. Do your best to only punch through the extra duct tape flap you created above, NOT through duct tape and lamination pouch.
  • Use the industrial hole punch to punch a hole in the foam puzzle tile.
  • Attach your lamination pouch using zip ties.

Cost: $25+ (depends what you have on hand)

Time to Make: 15 minutes

Pros: From watching interactions, I think this bag style is better for really little ones than the purchased tiles. Babies can see the movement inside the tiles and can use their hands and body weight to move objects around.

Cons: We have never successfully made one of these tiles that has not eventually leaked. Mostly, those leaks don’t occur until after 2-3 months of regular use. These bags can also take a while to make, especially if you refresh your collection after they start to break.

Purchased Liquid Tiles

We recently purchased the Excellerations Large Liquid Tile set from Discount School Supply. While pricey ($142 for the four tiles), these are sturdy to the point of being heavy to pick up. Each tile has a different color inside, and it takes some weight (or gravity if you pick them up and lean them against a wall) to make the liquid move. Adults can stand and jump on them with no sign of any wear.

There are very similar looking tiles available from sellers on Amazon, though those generally have questionable reviews.

We have only had these for about a month, with consistent use 2-3 times a week for only about three weeks, but there is no sign of leaking or damage.

Pros: These are sturdy and require no staff time to make or setup. Cleaning is a breeze–I just use cleaning wipes on them after each story time.

Cons: They are costly. Depending the materials you have on hand, you may be able to make quite a few liquid tiles yourself for less than $10. I also don’t think these are as exciting for the babies, as it takes a lot more force to move the liquid. The adults and walking kids really like this style.

Conversation Starters

Start conversations as babies play with this tool by asking questions like:

  • What do you see in the tile?
  • What does the tile feel like?
  • What colors are inside the tile?
  • Can you stomp on the tile?
  • Can you make the colors move?

Stretch Vocabulary

When talking with little ones, use big words and small words. The more new words a child hears, the larger their vocabulary will be when they start to learn to read.

Consider using some of the following vocabulary words when using this activity:

Bend
Dry
Examine
Explore
Find
Flexible

Grasp
Hunt
Inspect
Investigate
Mushy
Search

Shape
Smooth
Spot
Squeeze
Squishy
Wet

Science Baby!

Before there was Play & Learn, there was the idea of Science, Baby. A presentation at an annual ALA Conference by Brooklyn Public Library about their Science Baby! program opened my eyes to how much more babies can do than what many baby storytime outlines imply. Babies are so much more than passive observers–their brains are developing faster than they ever will for the rest of their lives–combined. STEM concepts do not need to be limited to older children. In fact, babies are the perfect example of little scientists as they learn everything about the world:

Poster from Nerdy Baby

My own Science Baby! program finally became a reality during our winter storytime break in late December. Seventy babies and adults joined me for a morning of baby play with a STEM twist.

Activities were broken down into a few rough categories. They included:

Some of these stations just involved putting out an item, like mirrors for mirror play. Others involved some ahead of time creation, like the sensory bottles. Still more involved in-room setup, like attaching sticky contact paper to the wall and building the pool noodle counter by stringing pool noodle pieces to string tied between two chairs.

Each station included a front and back laminated handout explaining the value of the particular activity, what little ones are learning, conversation starters, and vocabulary to stretch conversations with little ones.

We had many older siblings join in the fun as well, particularly enjoying all of the building activities. The sticky contact paper, baby pool play, bubbles, pom pom drop, and sensory bottles were the most well-loved activities.

Most families stayed for about 45-50 minutes. I’m looking forward to bringing this back again someday!

Baby Play: Puppet Time

After each of my baby storytimes, I include a Discovery Time free-play session that encourages parents to talk to one another and to interact with their children. I include a variety of fine motor, gross motor, and sensory activities that appeal to 0-2-year-olds.

If your library is anything like mine, you have a good stash of high quality puppets stashed away somewhere. These are probably frequently used by librarians in storytime–there are so many amazing puppet rhymes, books, and songs for all ages (check out my Bark George post for one of my favorites).

One of my coworkers asked a great question about a year ago–why do we leave the majority of these puppets locked away in cabinets most of the time? We may use 3-5 in an average storytime, leaving 50 puppets in storage. While we don’t want to put these often expensive puppets out in public areas for unsupervised free play–we are well aware of what happens to items left out for public use–these could be used as a play item in supervised, post-storytime play.

Puppets are an excellent tool for developing social and emotional skills in children of all ages. Puppets provide an easy way to grab the attention of little ones. Babies and toddlers like exploring their soft texture. Older toddlers can fit their hand inside of a puppet to make it move and interact with others, practicing social and fine motor skills.

There are a variety of ways to include puppets in your storytime, beyond the standard puppet rhymes. Consider:

  • Using puppets as a “manipulative”, just like you would use shaker eggs or scarves. Little ones can select a puppet from a bin (practicing making choices). Provide some questions for little ones and caregivers to answer together–“what animal is your puppet?”, “what sound does your puppet make?”, “what is your puppet’s name?”. End with a dancing song that makes it easy to include their new stuffed friend.
  • Put out a bin of puppets (or a baby pool of puppets) during storytime after play. Puppets naturally promote parent-child engagement while also providing some time for little ones to explore this item often reserved for adults.

Recommended Puppet Purchases

Our best puppets are from Folkmanis. You really cannot go wrong with their puppets, but some of my favorites from their current selection include:

Price: Use what you own. Folkmanis puppets are expensive (often $30+ each). Make sure to ask about discounts for buying in bulk–they have a deal allowing you to get 50% off all puppets if you agree to spend a certain amount (around $300-$400 after the discount).

Conversation Starters

Start conversations as babies play with this tool by asking questions like:

  • What animal did you pick?
  • What sound does this animal make?
  • How does the puppet feel?
  • Can you make the puppet talk?
  • Can you tickle the puppets head?
  • What can you do with the puppet?

Stretch Vocabulary

When talking with little ones, use big words and small words. The more new words a child hears, the larger their vocabulary will be when they start to learn to read.

Consider using some of the following vocabulary words when using this activity:

Animal
Colorful
Fluffy
Friendly
Furry
Hand

Hidden
Jump
Laugh
Loud
Pet
Pretend

Quiet
Soft
Sound
Surprise
Tickle
Touch

Baby Play: Sensory Boards

After each of my baby storytimes, I include a Discovery Time free-play session that encourages parents to talk to one another and to interact with their children. I include a variety of fine motor, gross motor, and sensory activities that appeal to 0-2-year-olds.

Sensory boards are not new. Babies love to explore different textures, some of which they may be experiencing for the first time. Sensory boards allow little ones to explore textures in a controlled environment, including small materials that would be choking hazards if loose but are interesting to explore when secured to a flat surface. Boards can lay flat on the floor, be propped against a wall, or can be free standing depending on what they are made out of.

I have a made a few sensory boards over the last few years, with my favorite versions visible in the pictures. Some of my personal tips:

  • I like using trifold boards, as these can stand up on their own in the middle of a room. Cutting them in half horizontally makes them more accessible for the smallest babies and make them more durable.
  • Colored trifold boards were a game changer for me. Having a colored background makes the textured materials on these boards that much more appealing to small hands and eyes.
  • Always, always check everything on your board before giving it to little ones. Babies have the strongest fingernails and are determined to tear everything off of your sensory boards. Hot glue can only do so much. Keep an eye on these during play too, especially if you have anything on the board that would be a choking hazard if removed.

I also have a second style of board that I made recently for a science/stem-focused baby play program, a textured shape board. While I wish this was a colored background, the white was what I had available at the time. It focuses on shape-based exploration, especially for toddlers and older babies.

How to Make Sensory Boards

Materials: colored trifold board, hot glue, various textured surfaces

Steps:

  • Cut colored trifold board in half horizontally, so each piece can stand on its own.
  • Use a hot glue gun to attach pieces of various textured elements. Consider cutting textured pieces into shapes.

Cost: $5+

  • Colored Trifold Board
  • Various textured surfaces:
    • Pipe Cleaners
    • Pom Poms
    • Bottle Caps
    • Felt
    • Fur
    • Foam
    • Carpet
    • Styrofoam
    • Popsicle sticks
    • Bubble wrap
    • Glitter Paper
    • Pool Noodle Pieces
    • Foil
    • Lace
    • Tulle
    • Wood Shapes
    • Ribbon

Time to Make: 15 minutes

Conversation Starters

Start conversations as babies play with this tool by asking questions like:

  • Which texture is the softest?
  • Which texture is the roughest?
  • What color is that texture?
  • How does that texture feel?
  • What is this texture?
  • Which textures make a noise when you touch them?

Stretch Vocabulary

When talking with little ones, use big words and small words. The more new words a child hears, the larger their vocabulary will be when they start to learn to read.

Consider using some of the following vocabulary words when using this activity:

Bumpy
Coarse
Delicate
Dry
Fine
Firm

Fuzzy
Itchy
Jagged
Light
Loose
Reflective

Rough
Sandy
Silky
Smooth
Soft
Spongy

Baby Play: Sticky Paper

After each of my baby storytimes, I include a Discovery Time free-play session that encourages parents to talk to one another and to interact with their children. I include a variety of fine motor, gross motor, and sensory activities that appeal to 0-2-year-olds.

Finding multiple ways to use one item is a staple for library programming, and something I try to do with baby play materials. Libraries only have so much money and so much storage space (as do parents). Our regular storytime space has floor-level windows that work perfectly for foam shape water play. Our larger programming space, which generally works better for our large crowds, unfortunately does not have windows. However, a similar activity can be recreated with contact paper taped to the wall, creating a sticky surface.

Foam shapes (also tissue paper and construction paper scraps) stick easily to contact paper. Little ones quickly realize that some things are too heavy to stick, helping them experiment with cause and effect. Older toddles can also practice identifying colors or shapes.

How to Make Sticky Paper Play

Materials: contact paper, painter’s tape, scissors, objects to stick (foam shapes, construction paper, tissue paper, etc).

Steps:

  • Lay contact paper on floor in front of wall. Cut strip to preferred size.
  • Tape paper to wall with side that peels off facing you.
  • Once secure, peel off one piece of tape at a time to remove cover for sticky part of paper. Put each piece of tape back as you peel so that the paper doesn’t fall off the wall.
  • Consider additional pieces of contact paper as your wall space allows.
  • Put out objects to stick to paper.

Cost: $10+

  • Contact Paper Roll
  • Foam (if creating foam shapes)
  • Construction Paper (if using as sticky object)

Time to Make: <5 of prep, 5+ minutes of time immediately before program

Pro-Tip: Make sure to plan the time to tape up the paper before your storytime. The contact paper can be hard to wrangle.

Conversation Starters

Start conversations as babies play with this tool by asking questions like:

  • What colors are you using?
  • What does the paper feel like?
  • Why did that fall off the paper?
  • What happens if you stick this to the paper?
  • Can you find some red paper?

Stretch Vocabulary

When talking with little ones, use big words and small words. The more new words a child hears, the larger their vocabulary will be when they start to learn to read.

Consider using some of the following vocabulary words when using this activity:

Adhere
Adhesive
Attach
Cling
Color
Fall

Fasten
Fix
Glue
Hold
Outline
Pattern

Shadow
Shape
Silhouette
Slump
Stay
Stick

Baby Play: Giant Ball Play

After each of my baby storytimes, I include a Discovery Time free-play session that encourages parents to talk to one another and to interact with their children. I include a variety of fine motor, gross motor, and sensory activities that appeal to 0-2-year-olds.

As a child, did you ever longingly walk past those giant ball bins in the Walmart or Target play aisle? I did, and I imagine many little ones today do as well. While those giant balls are cheap, they are not fun to store or manage in a house filled with breakable items protected on high shelves from small hands. Since these balls are not ideal for many homes, they are perfect for baby play in the library, since we have the opportunity to provide adults and children with toys and activities they may not be able to experience at home.

These “giant” balls can be used for many purposes. If being rolled or tossed between an adult and child, they can help develop gross motor skills. These balls often have different textures, providing a sensory experience. The littlest babies enjoy being bounced on these balls, especially to the rhythm of music or the rhythm of words. In my crazy storytime dreams, every child is being bounced on one of these to our weekly bounce rhymes as we practice phonological awareness skills by focusing on the small parts of words. While I know that the storage required for that many balls is simply impossible at essentially any library (we often have 30-50 babies per storytime), this kind of activity can still be encouraged during after storytime play.

As little ones grow older, it is fascinating to watch them figure out new ways to use everyday play items as well. The toddler in the image above was working with dad to fill the muffin tray with ball pit balls. He asked for an orange ball–and she delivered.

Recommended Giant Ball Play Purchases

  • Giant Balls (toy aisle of any big-box store)
  • Storage Bag

Price: Typically $2-$5 a ball

Pro-Tip: See if your big-box store also sells storage bags for giant balls. I would like a mesh one that can be pulled closed, but I haven’t found that in my neighborhood, so we use extra large garbage bags from maintenance. They easily hold our four big balls, with the possibility of squeezing in one more.

Conversation Starters

Start conversations as babies play with this tool by asking questions like:

  • Can you bounce on top of a ball with an adult’s help?
  • How does the ball feel?
  • What happens when you push the ball?
  • What color is the ball?
  • Can you stack two balls on top of each other?

Stretch Vocabulary

When talking with little ones, use big words and small words. The more new words a child hears, the larger their vocabulary will be when they start to learn to read.

Consider using some of the following vocabulary words when using this activity:

Big
Bouncy
Bound
Bump
Curve
Giant

Light
Push
Rebound
Ricochet
Roll
Rotate

Round
Shiny
Smooth
Sphere
Swivel
Throw